Firebird/Introduction: Difference between revisions
From stonehomewiki
Jump to navigationJump to search
Stonezhong (talk | contribs) |
Stonezhong (talk | contribs) (→Beirf) |
||
| (18 intermediate revisions by the same user not shown) | |||
| Line 1: | Line 1: | ||
<p> [[Firebird]] </p> | <p> [[Firebird]] </p> | ||
= Beirf = | = Beirf = | ||
<div class="toccolours mw-collapsible mw-collapsed expandable"> | <div class="toccolours mw-collapsible mw-collapsed expandable"> | ||
<div class="mw-collapsible-preview">Brief</div> | <div class="mw-collapsible-preview">Brief</div> | ||
<div class="mw-collapsible-content"> | <div class="mw-collapsible-content"> | ||
* [https://github.com/stonezhong/firebird Source Code in Github] | |||
Firebird is a Python based Stream Processing Framework | Firebird is a Python based Stream Processing Framework | ||
* Make it easy to create streaming processing data pipeline using python | * Make it easy to create streaming processing data pipeline using python | ||
* Make it easy to deploy your pipeline to Kubernete Cluster, so your pipeline can run at scale. | * Make it easy to deploy your pipeline to Kubernete Cluster, so your pipeline can run at scale. | ||
* A Management Web UI to visualize your pipeline topology. | * A Management Web UI to visualize your pipeline topology. | ||
* The firebird framework | * The firebird framework encourages you to write reusable streaming processing unit and encapsulate it in Generator or Node or Sink. | ||
</div> | </div> | ||
</div> | </div> | ||
<p></p> | <p></p> | ||
= | = Use Python to build streaming pipeline = | ||
<div class="toccolours mw-collapsible mw-collapsed expandable"> | <div class="toccolours mw-collapsible mw-collapsed expandable"> | ||
<div class="mw-collapsible-preview"></div> | <div class="mw-collapsible-preview"></div> | ||
<div class="mw-collapsible-content"> | <div class="mw-collapsible-content"> | ||
Your python code could be as simple as below. All you need to do is, create Generates, Nodes and Sinks, and assemble them together using >> or << operator. If you have experience with Apache Airflow, you should be quite familiar with this model. | Your python code could be as simple as below. All you need to do is, create Generates, Nodes and Sinks, and assemble them together using <code>>></code> or <code><<</code> operator. If you have experience with Apache Airflow, you should be quite familiar with this model. | ||
<pre><nowiki> | <pre><nowiki> | ||
| Line 62: | Line 65: | ||
</nowiki></pre> | </nowiki></pre> | ||
</div> | |||
</div> | |||
<p></p> | |||
= Easy to deploy to Kubernete Cluster = | |||
<div class="toccolours mw-collapsible mw-collapsed expandable"> | |||
<div class="mw-collapsible-preview">Brief</div> | |||
<div class="mw-collapsible-content"> | |||
To deploy your pipeline, you can simple run the command below, you can specify parameter <code>-r</code> to specify how many pods you need to run pipeline, default is 1. Here is an example: | |||
<pre><nowiki> | |||
# it start pipeline "test", using 10 pods to run your pipeline simultaneously. | |||
/usr/src/app # pipeline start -pid test -r 10 | |||
</nowiki></pre> | |||
</div> | |||
</div> | |||
<p></p> | |||
= Web UI = | |||
<div class="toccolours mw-collapsible mw-collapsed expandable"> | |||
<div class="mw-collapsible-preview">Home Page</div> | |||
<div class="mw-collapsible-content"> | |||
Home page shows all pipelines. You can see | |||
* <code>ID</code>, each pipeline has a unique id | |||
* <code>Namespace</code>, each pipeline is deployed in a kubernete namespace | |||
* <code>Image</code>, the name of the docker image for the pipeline | |||
* <code>Module</code>, the python module name that contains the main pipeline entry. | |||
* <code>Running</code>, show if the pipeline is currently running or not. | |||
* <code>Description</code>, show the description of the pipeline. | |||
<html><img src="https://mywiki.s3.amazonaws.com/firebird-home-ui.png" width="100%"></html> | |||
</div> | |||
</div> | |||
<p></p> | |||
<div class="toccolours mw-collapsible mw-collapsed expandable"> | |||
<div class="mw-collapsible-preview">Pipeline Page</div> | |||
<div class="mw-collapsible-content"> | |||
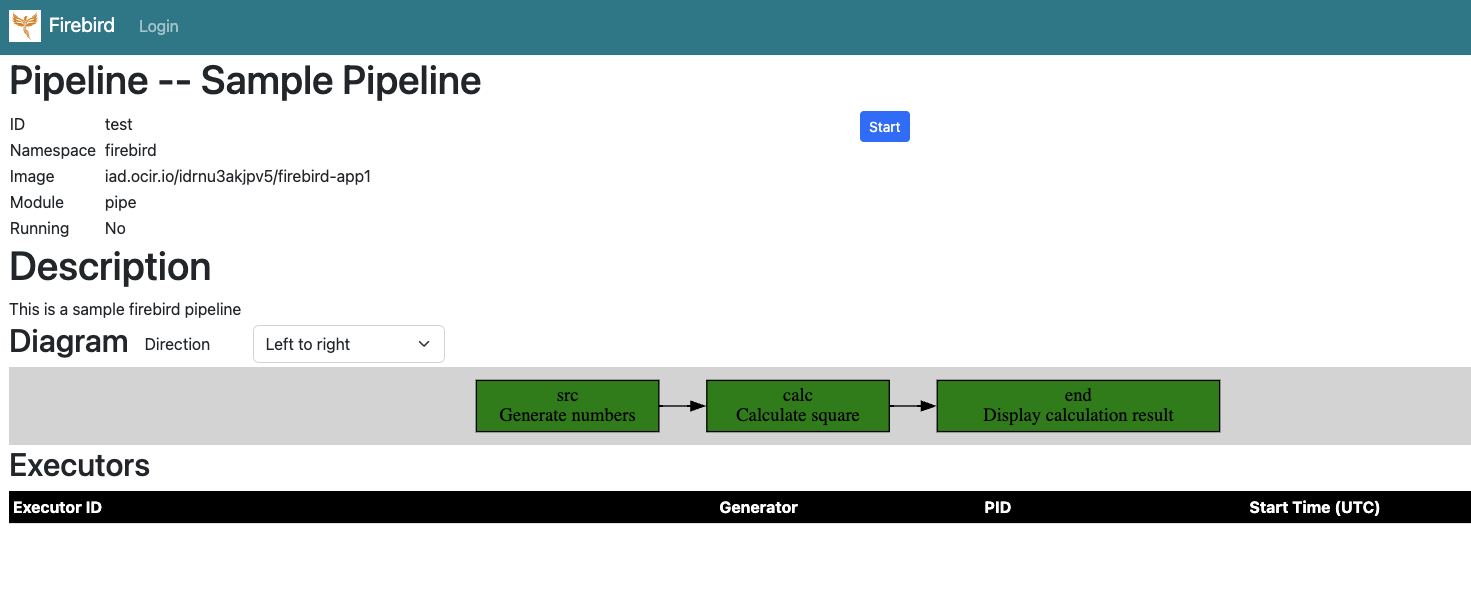
Show the details of a given pipeline. Here is an example: | |||
* <code>ID</code>, each pipeline has a unique id | |||
* <code>Namespace</code>, each pipeline is deployed in a kubernete namespace | |||
* <code>Image</code>, the name of the docker image for the pipeline | |||
* <code>Module</code>, the python module name that contains the main pipeline entry. | |||
* <code>Running</code>, show if the pipeline is currently running or not. | |||
* <code>Description</code>, show the description of the pipeline. | |||
* <code>Diagram</code>, show the topology of the pipeline. You can click each node to see the node details. | |||
* <code>Executors</code>, if the pipeline is running, you can see the status of each executor. | |||
* You can click the "Start" button to start the pipeline | |||
* You can click the "Stop" button to stop the pipeline | |||
<html><img src="https://mywiki.s3.amazonaws.com/firebird-pipeline-ui.png"></html> | |||
<br /><br /> | |||
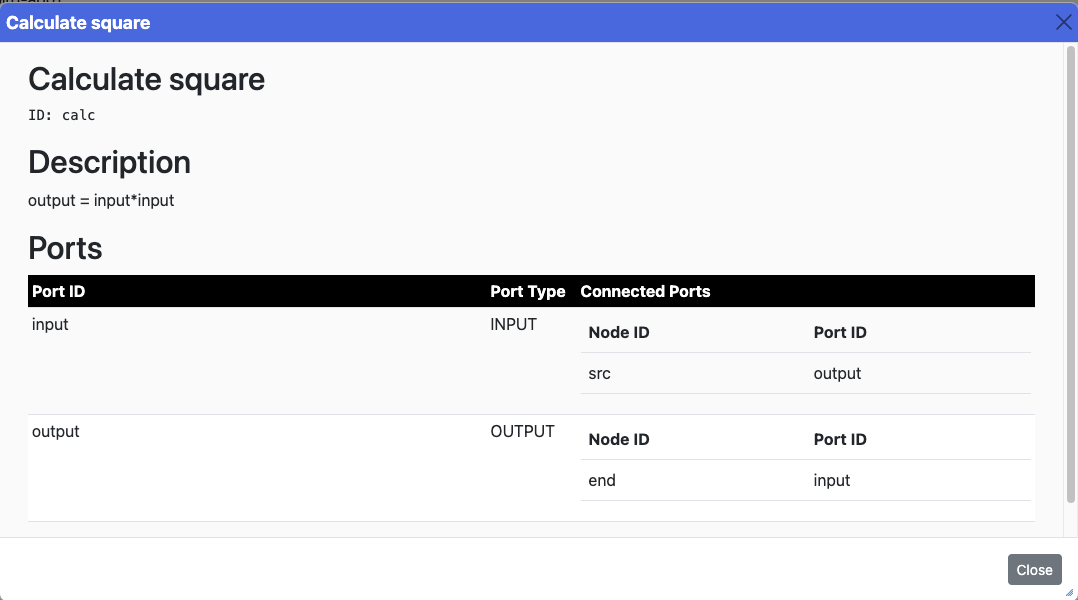
<h2>Node dialog box</h2> | |||
If you click a node, or a generator or a sink, you will see a node dialog box, it show the id, title and description of the node. It also shows what are the connected ports, so you know the upstream node and downstream node. | |||
<html><img src="https://mywiki.s3.amazonaws.com/firebird-pipeline-node-dialog-ui.png"></html> | |||
</div> | </div> | ||
</div> | </div> | ||
<p></p> | <p></p> | ||
Latest revision as of 10:51, 15 September 2023
Beirf
Use Python to build streaming pipeline
Easy to deploy to Kubernete Cluster
Web UI
Home Page
Home page shows all pipelines. You can see
ID, each pipeline has a unique idNamespace, each pipeline is deployed in a kubernete namespaceImage, the name of the docker image for the pipelineModule, the python module name that contains the main pipeline entry.Running, show if the pipeline is currently running or not.Description, show the description of the pipeline.

Pipeline Page
Show the details of a given pipeline. Here is an example:
ID, each pipeline has a unique idNamespace, each pipeline is deployed in a kubernete namespaceImage, the name of the docker image for the pipelineModule, the python module name that contains the main pipeline entry.Running, show if the pipeline is currently running or not.Description, show the description of the pipeline.Diagram, show the topology of the pipeline. You can click each node to see the node details.Executors, if the pipeline is running, you can see the status of each executor.- You can click the "Start" button to start the pipeline
- You can click the "Stop" button to stop the pipeline
Node dialog box
If you click a node, or a generator or a sink, you will see a node dialog box, it show the id, title and description of the node. It also shows what are the connected ports, so you know the upstream node and downstream node.